A Little Cupboard Dreaming…

…of Farrow and Ball.

A few months back on a sunny Sunday I went along to a car boot. As I’ve mentioned before, I love to find those hidden treasures often over-looked by others but that jump out to you.

Ed’s face was a picture when I pulled some tatty candlesticks, a huge piece of un-inspiring piece of artwork in a tired frame and a wooden cupboard from my KA (it was a bit of a squeeze but determination got them in!)

With a bit of love and a lot of sandpaper, the candlesticks were transformed into a pair of little gems.

And soon to follow, minus the hideous picture was the huge wooden frame. Now it’s a bit of shabby chic finery and is perfect in our kitchen as a chalkboard…


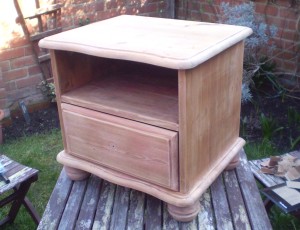
The cupboard has been a bit more of a challenge. It was gorgeous, but hidden under a thick layer of tar-like varnish (and bright red paint inside!) It was going to need some serious elbow grease.

Too big for the Bumbleblue desk, I had to wait for some decent weather to tackle it outside. It took a whole afternoon to get down to the wood, but it was definitely worth it.

Many, many sheets of sandpaper later and it was bald! Not an inch of gloop was left and after a quick wipe down I could finally get the paint out.

Farrow and Ball no. 229 Elephants Breath was perfect. Delicate and chic, perfect for a little cupboard that had been hidden under caked-on varnish. Only a few coats in and already it looks like a new piece of furniture!


Hopefully with all this gorgeous weather, I will get this little beauty finished in no time. Watch this space…

Afternoon Tea

I’m sure most people are aware by now, that when it comes to baking cakes I’m no Mary Berry. Still, I keep hoping one day that natural instinct to bake fabulous cakes and biscuits will kick in.

It doesn’t seem as though today was that day.

I’ve tried scones twice before and neither attempt was that successful. I forgot the eggs the first time, creating scones so hard you could have used them to build houses with. The second batch included all the right ingredients and would have been the right consistency. Would have if I hadn’t rolled them out as thin as biscuits thinking they would rise. I had created what I named ‘scone-scuits’; all the taste of a scone in the handy size and shape of a biscuit (Dragons Den here I come!)

I can honestly say I don’t know what happened with my latest batch. I followed the recipe carefully and stuck to the method. When the recipe told me to ‘…turn the dough-like mixture out onto a lightly floured surface…’ I slopped out a wet, gooey and sticky mess. I’m guessing too much milk.

After using what must have been my body weight in flour, I managed to cut out some scones and get them into the oven. They looked a bit pasty going in…

…At least they came out smelling yummy. They won’t win any W.I rosettes but I’m sure they’ll go down a treat with a cup of tea.


Lino Printing For Fathers Day

I still can’t get the hang of designing and making products for specific occasions months in advance. We’re coming towards the end of May and I’m only just thinking about Fathers Day.  I have however made a note in my diary to start thinking about Christmas decorations in July – last year was just a bit too manic to repeat! I can’t wait to see Ed’s face when he starts spotting snowflakes mid-summer.

With Fathers Day round the corner, I’ve been scribbling down suitable images and designs for cards without going down the usual routes. I’ve been trying to keep my designs fairly original – to me there’s no point hand crafting a card that’s the spitting image of something you can buy in every other high street card shop.

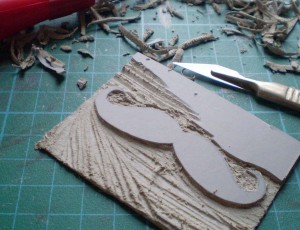
I’ve also been experimenting with how I produce my cards and even had a go at some lino printing. The last time I tried this was in uni and I sliced into my hands that many times, I’ve been reluctant to try it again! When you’re looking to be original, a few risks are necessary now and then (any lino printers reading this will be laughing their socks off!)

Feeling brave, I attempted two simple designs to start with – better to work your confidence up with something small right?

I drew out the design and armed with my lino, iron (a very technical and necessary aid) and my cutting tools, I was ready.

The iron tip was from my house mate at the time. She’d had a good chuckle at me trying to hack away at the lino cold, and out of sympathy (and probably my sanity) she told me the lino is easier to cut if it’s heated slightly.

Just one amazingly important point I’ve got to stress, that might seem obvious. Keep your fingers out of the way! I know this and I know the tools I’m using are incredibly sharp. This all said, I still insist on holding the lino I’m working on, in the direction of all my cuts. One day, when I’ve got no fingers left, I might learn.

After I was happy with the stamps, I tried them out to see what they would look like and if they had actually worked.

Chuffed with how they had turned out, it was onto the cards and a few Fathers Day type messages…

I think I’m a little bit hooked to lino printing now and can’t wait to try other designs – I just hope my poor hands will forgive me!

Home Sweet Bumble Home

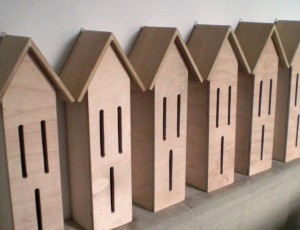
This is the journey of my Butterfly houses.

I always like to see how piles of materials can be turned into little creations. Every designer can put a little bit of themselves into each product, giving each one their own signature style.

As usual I visited my product development manager and my personal joiner (Mum and Dad!) and discussed a new idea. I left Dad with a rough design to see if it would be possible and cost-effective to make. Of course, Dad being Dad completely succeeded my expectations and on my next visit, a small town of Butterfly houses were waiting for me.

Made of quality wood and each one hand crafted by a joiner, Butterflies will be making a bee-line (or should that be a butterfly-line) to make one of these their home.

Once they land on the Bumbleblue desk, I can get my paint pots out and each house is given a few coats, sanded slightly in between to get a nice smooth and even finish. This also helps when I paint on any wording, which isn’t as easy on thick, lumpy paint.

The final coat is left to dry completely, and with my latest batch the sun made an appearance, perfect for helping the paint to dry.

When the whole house is finished, it’s then given a coat of external varnish to protect it from the elements, which have been a touch random lately!

Every house will reach its new owner with a little guide to help you to make the most of it and what to do to encourage butterflies to stay. I think one of these will definitely be making its way into our garden, they’re just too nice to sell them all!


Oats So Yummy

After being busy with my day job and orders from the website, I put aside an afternoon to have a bit of time off. It’s great to be busy, but sometimes it’s nice to be selfish with my time.

I decided to give some baking a go and this time, it was my Mums flapjack recipe. When I think of flapjack, I picture yummy, golden, oaty loveliness. A little bit gooey with crunch round the edge and a perfect accompaniment to a cup of tea! Also a perfect excuse to use my new scales.

As I was melting the butter, I started to think about where the idea for flapjack first came from (like you do) Was it an accidental spillage of someones porridge into a cake mix?

Curiosity always gets the better of me and I reached for the laptop. Would you believe it actually originated in Britain, and the name flapjack was being used as early as the 17th Century but at that time, it described something similar to an apple tart. It wasn’t until around 1935 that the humble flapjack took the rolled oats form we know today.

So there you go! Back to my melting butter and the rest of the ingredients…


12 oz Butter

16 oz Oats

1 Pinch of Salt

6 oz Sugar

6 tsp Golden Syrup

First melt the butter slowly in a pan. Once it’s all melted, take it off the heat and stir in the sugar and syrup.

Stir in the salt and then the oats last. Mix this all well.

Pour onto your baking tray – not too thin, we want a bit of gooey in the middle!

Put into a preheated oven, gas mark 4 for around 30 – 35 minutes or until golden.

Absolutely delicious and simple enough to make even myself feel like a bit of a chef.

Happy baking!